How to Generate the Sierpinski Triangle [2/10]
How to Generate the Sierpinski Triangle
In this step-by-step guide, we will provide examples and detailed explanations on how to generate the Sierpinski Triangle using a computer program. These explanations can be applied to any other programming language as well.
What is the Sierpinski Triangle?
The Sierpinski Triangle is a fascinating fractal shape with a hollow structure. It exhibits fractal and recursive properties, which are best illustrated by its self-similarity: the smaller sections of the triangle resemble the entire triangle itself.
This pattern has been used as a decorative motif and was named after the Polish mathematician Waclaw Sierpiński, who studied its properties.
Drawing the Base Triangle
To draw the Sierpinski Triangle, we start by creating an ordinary triangle. This will be the foundation for our program.
The first step is to set the vertices of the triangle by specifying their coordinates.
In the source code, these coordinates are defined in the first three statements.
The next statement uses these vertices to draw a blue triangle on the screen.
[Run the program by clicking the 'Run' button]
The vertices, denoted as p1,
p2, p3,
are then drawn in different colors:
the top vertex is red, the left vertex is orange, and the right vertex is cyan.
This is accomplished by the last three statements in the source code.
[Run the program to see the triangle]
[Click the 'Next' button at the top of the page or press the F4 key to proceed.]
2. The Three Inscribed Triangles
The next step in generating the Sierpinski Triangle is to draw
three smaller triangles that are inscribed within the larger triangle.
Each of these triangles is be colored to match the vertex it touches.
[Run the program by clicking the 'Run' button]
To draw the three smaller triangles,
the mid-points of each side of the large triangle need to be computed first.
In the source code, these mid-points are named
mid12, mid13, mid23.
Each mid-point is visualized in a different color: purple, azure, and olive.
[Run the program]
The three inscribed triangles are then drawn in colors that correspond to the vertices they touch: red, orange, and cyan.
Note that ZedLX does not have a built-in function for calculating mid-points. Instead, a user-defined function called MidPoint is provided at the end of the source code. This function calculates the mid-point of a line segment given two points. There are many possible implementations of this function, and the source code includes three variations, where only the last one is used in this program.
3. A Function for Drawing
The most common way to generate the Sierpinski triangle is by using functions. To make a function that generates the Sierpinski triangle, the code from the previous page only needs to be slightly reorganized.
The function SierpinskiTriangle created in such a manner
won't yet draw the Sierpinski triangle, but it is an important step towards
writing the correct function.
[Run the program by clicking the 'Run' button]
To truly generate the Sierpinski Triangle requires a recursive function.
Writing recursive functions can be challenging,
so it is a good idea to take some intermediate steps in the process of writing a recursive function.
[Run the program]
It is important to rename all the points within the SierpinskiTriangle function. The letters A, B, and C have now replaced indices 1, 2, and 3 inside the function.
The final adjustment is to perform a call of the SierpinskiTriangle function at the point in the source code where the blue triangle was previously displayed. This new call to the SierpinskiTriangle function now includes an unused argument of value 4, called the level. This argument will be essential for the next enhancement of the program.
4. Writing a Recursive Function
To understand the Sierpinski Triangle recursively, notice that it is composed of three smaller Sierpinski Triangles, and each of those is composed of three smaller Sierpinski Triangles, and so on. This recursive nature creates an infinitely intricate pattern.
The hardest step of writing a recursive Sierpinski triangle function is, of course, the recursion. The recursion can be very mind-boggling, so it is usually the best to stick to some good old rules.
A rule, and a very important insight, is that every recursive function must have an atomic case, triggered by the stopping condition. Otherwise, the recursion would continue indefinitely.
The Atomic Case of Recursion
The actual stopping condition can be something practical, of our choice. In the provided source code, the atomic case is triggered when level falls down to 0, which is the stopping condition.
So, what is the atomic case for generating the Sierpinski triangle? Obviously, it is a single triangle. Therefore, a single triangle should be drawn when the stopping condition is reached. The provided source code draws that single triangle in the pink color.
It is also important to remember to exit the function in the atomic case, as that is the main point of the atomic case. The return statement exits the function. In recursive functions, it exits from only one level of recursion, not from the entire call tree.
The entire source code of the atomic case is provided at the beginning of the SierpinskiTriangle function.
Adding the Recursive Case
Writing just the atomic case is not sufficient to make a function recursive.
The second required change, compared to the previous page, is that recursive calls
have to be performed inside the recursive function.
In the source code, the correct recursive calls are now stated,
which results in an image that already looks a lot like the Sierpinski triangle.
[Run the program]
The recursive case of the SierpinskiTriangle function is everything not belonging to the atomic case. Obviously, any recursive case must contain recursive calls.
When writing the three recursive calls that draw the inscribed Sierpinski triangles, the level needs to be provided as an argument instead of the color. In order to prevent the recursion from running indefinitely, all recursive calls must end in an atomic case in a finite number of steps. To guarantee finiteness, the level gets reduced by 1 on each level of recursion. Therefore, the level will eventually fall down to zero (from the initial value of 4), which will then trigger the stopping condition.
Compared to the previous page, the drawings of the three inscribed ordinary triangles
have simply been replaced by drawings of the three inscribed Sierpinski triangles.
With such a simple change, the program already works well.
The recursion always works in surprising and magical ways.
[Run the program]
5. Cleaning up the Sierpinski Triangle
The drawing of the Sierpinski triangle must now be cleaned up, compared to
the image produced by the previous page.
[Run the program]
The first change was to remove the drawings of mid-points
midAB, midAC,
midBC, which were previously
shown in purple, azure and olive colors. While mid-points
must be computed, they don't need to be displayed,
as they are making the final image much worse.
Now that the drawings of mid-points have been removed, the Sierpinski triangle can be clearly seen,
painted in the pink color.
[Run the program]
On the next page, the depth of the Sierpinski triangle is increased.
6. Increasing the Depth of the Sierpinski Triangle
The number of levels of the Sierpinski triangle is now increased to 6, by the last argument
of the call to the user-defined function SierpinskiTriangle.
It is an increase by two compared to the image produced by the previous page.
[Run the program]
The color of the Sierpinski triangle has been changed to periwinkle.
Also, there is no more need to visualize, in three colors, the three vertices
p1, p2,
p3 of the big triangle,
so the drawing statements have been removed compared to the previous page.
[Run the program]
If you like this tutorial, you can use the gray sharing buttons to share it with your friends. The sharing buttons create a link to the current page. The buttons for Twitter, Facebook, Pinterest, Reddit and LinkedIn are provided.
On the next page, the selection of colors is made easier.
7. Coloring the Sierpinski Triangle
The Sierpinski triangle is now displayed in completely different colors,
compared to the image produced by the previous page.
[Run the program]
The clearScr function allows a default background color and a default drawing color to be provided. It enables both colors to be specified in the single line of the source code. In the source code, the single call to the function trianglep does not specify an explicit color anymore, which makes it use the default drawing color.
Compared to the previous page, the number of levels has been increased to 7.
As the number of levels of the Sierpinski triangle is being increased, the triangle
will actually become thinner and thinner. With a sufficiently high number of levels,
the entire triangle would disappear, as the Sierpinski triangle has a total area of zero.
At the same time, it has infinite sum of all edge lengths.
It is an extraordinary shape, indeed.
[Run the program]
On the next page, RGB triplets are used for coloring the Sierpinski triangle.
8. Coloring by RGB Triplets
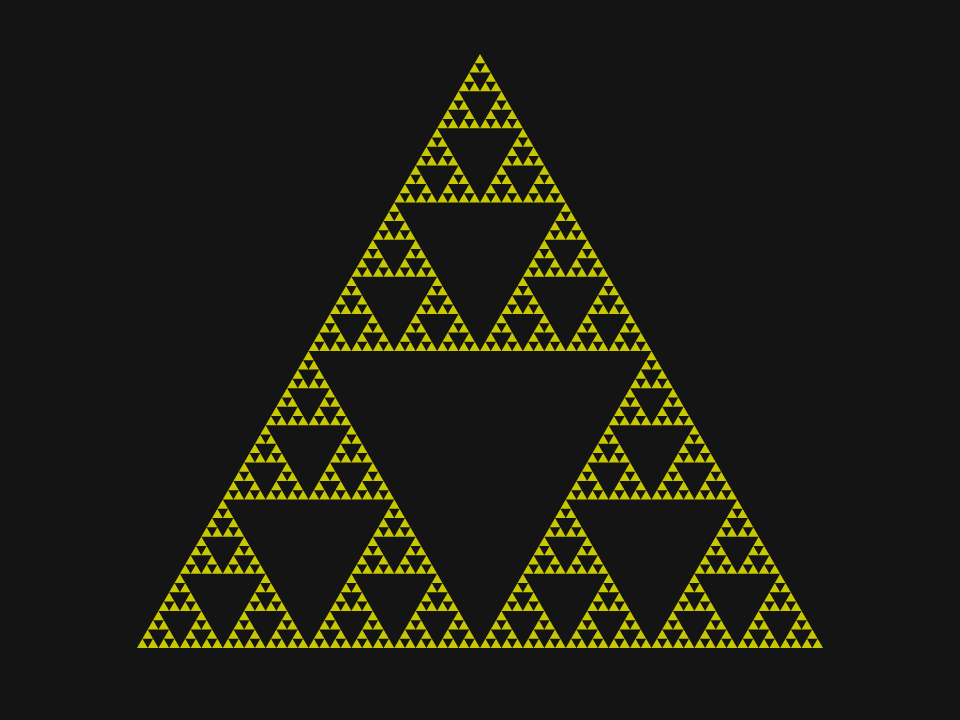
The drawing of the Sierpinski triangle is now in gold color on a blue background,
which looks very different than the image produced by the previous page.
[Run the program]
ZedLX allows colors to be given by RGB triplets inside the square brackets. It is important to note that the three RGB color components must be given as linear values in range of 0 to 100, as the data type 'color' in ZedLX is defined that way. The colors are then converted to the sRGB color space as they are displayed.
The number of levels of Sierpinski triangle is still 7, therefore it has not been increased.
There is not much point in increasing the level further, as the drawing is
quickly approaching the maximum resolution of the output image.
[Run the program]
On the next page, we examine the level of detail of the Sierpinski triangle.
9. Depth of Recursion
We now present a quick image sequence of a Sierpinski triangle with
increasing depth of recursion. The depth of recursion equals the level of detail.
[Run the program]
At any iteration of the main for loop, the level of detail is equal to the value of the loop's variable i. The level of detail starts from 0, ends at less than 9, and it is increased by one in each iteration of the loop. Each iteration lasts about one second, which is ensured by the call to the sleepMs function. This function produces a pause, where the argument is in milliseconds.
The end result is that a sequence of images is produced, showing the effect of increasing levels of detail of the Sierpinski triangle.
If you like this tutorial, you can use the gray sharing buttons to share it with your friends. The sharing buttons create a link to the current page. The buttons for Twitter, Facebook, Pinterest, Reddit and LinkedIn are provided.
10. Animating the Sierpinski Triangle
We now present an animation of a rotating Sierpinski triangle, displayed in the gold color
on the dark blue background.
[Run the program]
The usual facilities for animating objects in ZedLX have been employed. It is very easy to add animation to ZedLX programs. The source code shows the facilities employed to create this animation: vertical synchronization, clear screen, current time, and vector arithmetic with rotations in degrees. [Run the program]
With this page, we complete our tutorial on drawing the Sierpinski triangle. Click on the 'Articles' button at the top to select another article. We also suggest taking a peak into our main 'Gallery' of programs, and taking a look into 'Overview' of our main programming tutorial for beginners. Have fun!
<< F2:Prev - - F4:Next >>